Test knitters still needed for this double knit hat pattern! If you’re up for a challenge, I need one more knitter who is available to knit this hat by the 26th of March.
About This Pattern
A beholder stands before you, ready to wipe out your entire knitting group in one fell swoop! Little does he know, you’re a Level 3 Knitting Wizard. You point your knitting needle towards the beholder and a beam of crackling energy launches and attaches to it! You’re able to defeat this giant beast with your knitting prowess alone!
Okay, that’s not exactly how fight with a beholder would go, but we all know this is really about knitting. Witch Bolt is a Dungeons & Dragons-inspired double knit hat pattern. You knit it up using two colors and when you’re done, it’s magically reversible! Just kidding, there’s no magic here, just your awesome knitting.
In the pattern, I have explained in detail how to double knit stockinette and ribbing, as well as how to decrease while double knitting. If you’re new to double knitting, it can be a great way to get cozy with the method as the color pattern requires very little thought!
Coming Soon
Witch Bolt is set to release on March 30th on its own and also in a new Dungeons & Dragons-inspired hat bundle on Ravelry!
Teacups come in all different shapes, sizes, and designs, just screaming to be imitated through knitting! Like the Nice Cuppa hat before it, the Put a Bird on My Cuppa hat is inspired by dainty teacups. Featuring a complex colorwork pattern of blue and white, you’ll love watching the pattern emerge as you mindfully knit this hat. Remember to prepare your favorite cuppa before sitting down to knit!
Put a Bird on My Cuppa by @arossen2000Put a Bird on My Cuppa by KellyGirlKnits
CONSTRUCTION NOTES
The hat begins with 2×1 ribbing and a row of purls for flair. The rest of the hat is knit in stockinette stitch, using two colors, following the provided chart. A few rows after the color chart is complete, decreases begin to shape the crown and finish the hat.
TECHNIQUES
Knit, purl, cast-on Stranded colorwork
Decreases (k2tog)
Working in the round on circular needles
Working in the round on DPNs / with magic loop / with two circulars
MATERIALS Needles
US 1 / 2.5mm, 16”/40cm circulars or size to obtain gauge
Matching DPNs (or preferred tools) for working the crown
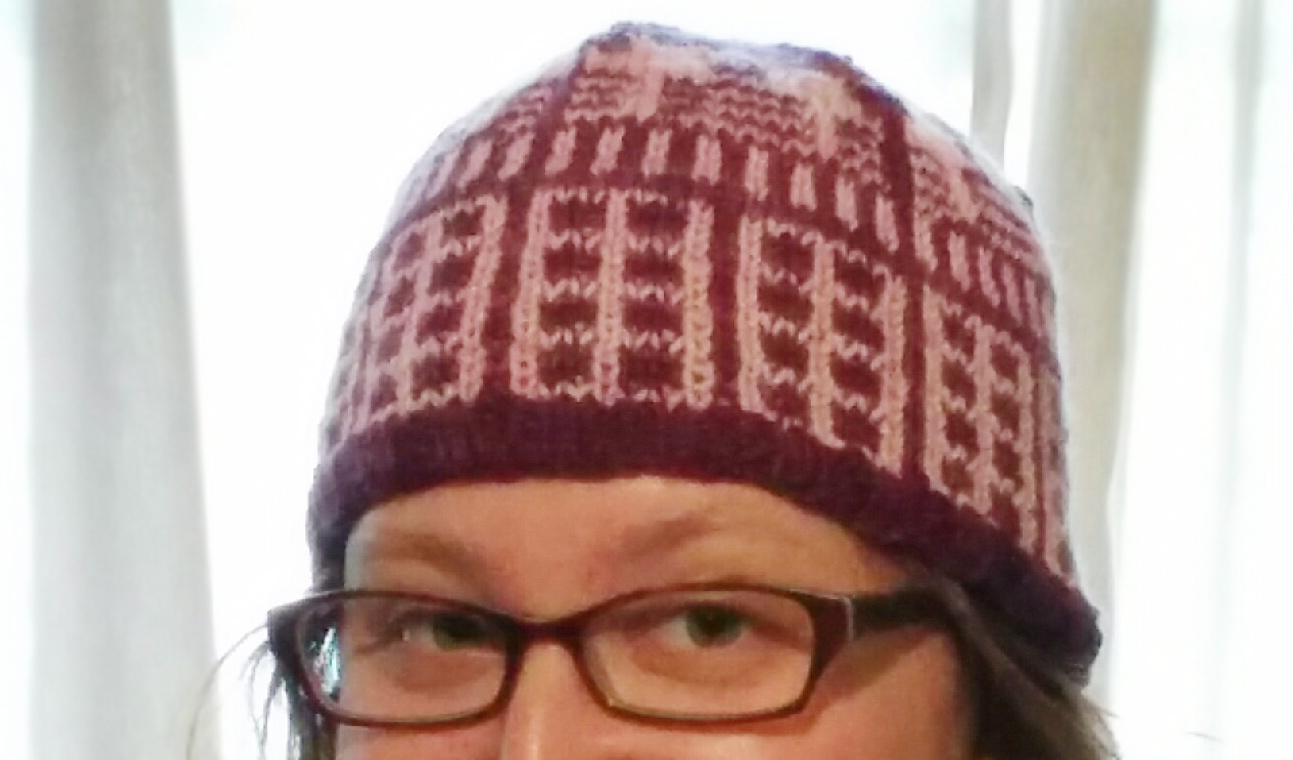
After the train wreck that was my mug cozy, I felt like I needed to redeem myself as a knitter and I think I did, so I wanted to share this finished knitted object with you all.
I found the INSULATE! hat pattern by Amy van de Laar on Ravelry a few weeks ago when looking for something to knit with two skeins of yarn John bought for me. It’s a 2-color hat, covered in Daleks, and the pattern is free!
Luminous in the May Day colorway, by Sincere SheepPolwarth Shimmer in the Plump colorway by Knitted Wit
I wasn’t sure about knitting pink and purple Daleks, so I held off on knitting the hat, hoping to find a more appropriate use for the yarn. But the urgent need for a pick-me-up knit trumped my color concerns and I decided to cast-on earlier this week.
I loved working with these yarns. They are both 85% Polwarth wool and 15% silk. The wool makes the yarn squishy and the silk makes the yarn soft(er). They’re both hand-dyed and had slight variations in color. (And in case you’re wondering, which you’re probably not, fiber-enthusiasts care to know what kind of sheep their wool comes from, which is why it is known that this wool is from Polwarth sheep.)
Dalek hat and a Doctor Who reference on my shirt (not planned, but I have so many Whovian shirts, it was bound to happen)
Oh, how I love to knit a hat. They’re so quick to knit up and this one only had 3 ends to weave in when I was done — quick finishing FTW.
If you enjoy stranded colorwork, I’d definitely recommend this pattern. Amy (the designer) gives very clear instructions on how to knit the hat and how to knit it without needlessly wasting too much yarn. Rows with minimal color changes actually just use slipped stitches from the previous row so you don’t have to carry the other color around the back. Pretty snazzy!
In other knitting news, I started knitting a shirtie today (that’s a shirt and a hoodie). This is my first non-accessory garment that I will be knitting. I’m nervous but excited at the same time. Will keep you all posted!
I’ve been working on a test knit for my mug cozy for probably a month, picking it up and putting it back down. The intarsia was a slow process, since I designed the color changes based on my own visual likes rather than ease of knitting. I’d also never done intarsia knitting before this.
For your memory, this is the color pattern I was working from.
With intarsia, you create a new little bobbin of yarn to work from each time there is a color change. So, you’re knitting around in blue, get to a cloud, switch to a small bit of white, then switch to a new bit of blue (that’s right, you don’t just pick up the old blue you were using before until you come back around). Because you don’t bring the yarn along behind the work, every time there is a color change, you get a new bit of yarn. For every new bit of yarn, there is going to be an end to weave in.
For a visual representation: All of the stars in this section of the pattern show where a new bit of yarn is going to be used. The thicker black lines indicate a section where a bobbin of different yarn is used.
As I was designing this, I had no experience with intarsia, therefore, gave no thought to how many ****ing ends there would be to weave it when I finished the cozy.
Attack of the spaghetti monster
I don’t even want to pretend I’m going to finish this test knit.
But either way, NAILED IT!
NAILED it! (NOT…)
Hahaha, just kidding. This poor mug cozy is a step away from being knitted vomit.
Aside from being a finishing nightmare, my technique was just not very good. The randomly loose stitches above would be fixed after I weaved in the ends of the yarn — they’re just loose because they’re not quite attached.
The blob thing that should be a sheep in a pasture though… wowwee.
I knit the clouds in seed stitch – k1, p1, then on the next row I’d purl the knits and knit the purls, creating these cute, fluffy clouds because purl stitches create a little horizontal bar that puffs out a bit.
The problem with purl stitches in colorwork is that the previous stitch is visible behind the purl bar. Not so noticeable when it’s white on light blue, but super noticeable when it’s white on dark green. I wanted the sheep to be fluffy, so I tried the same thing on them.
Another example of how using purl stitches in colorwork can go horribly wrong, since I did purl the white stitches below the black stitches
Another issue I had was in using this technique to be able to knit in the round while still using the intarsia technique. I thought I did this correctly everytime I turned my work, but apparently not because the start/end section of the mug cozy looks quite… jacked. If you’re not a knitter, just notice how most sections have a straight line of Vs going down, but in the middle… who knows what’s happening? Also, you should become a knitter.
Did I add stitches? I’m not sure, but that section looks totally wibbly-wobbly.
And my last gripe with this is that the green on the bottom needs more saturation. It’s being ousted on the next run.
So, it’s back to the drawing board with this pattern. Lessons learned:
Make sure your yarn colors are all equally saturated or it just looks sad.
Don’t try to be cute with your fluffy purl stitches when doing high-contrast colorwork.
It may not be worth the pain to create a color chart based solely on visual design — take the knitting experience into account and try to reduce the number of ends that will need to be weaved in at the end.
Read more about my adventure in creating my first knitting pattern:
I’ve done a bit more research on the color knitting techniques I should try out for my mug cozy and I’ve come to the conclusion that I need to learn intarsia knitting.
Before today, intarsia and stranded knitting were all the same to me. Now I know better…
When using the stranded knitting technique, the floating yarn on the inside of my mug cozy was unruly and out of control. To try and fix this, I looked for tips on stranded knitting and found that I could secure the float every few stitches to keep the wrong side of the stranded knitting from looking like a bowl of spaghetti. In that Knitty article that I’d found a few days ago, I failed to notice the “when to use intarsia vs color stranding” section, which suggests that if you have a pattern with blocks of color that span more than 5 stitches, you’ll probably want to use intarsia. Which I do.
Today, as I started yet another Google search for more suggestions on yarn management in colored knitting, I kept seeing “intarsia” pop up. I figured I should at least see what the deal was and when I started learning how to do intarsia knitting (not just looking at end-results), I realized that although intarsia may not make knitting my mug cozy easier, it will probably make a better end product.
Differences Between Intarsia and Stranded Color Knitting
The presence (stranded) and absence (intarsia) of floating yarn behind the work. This is a big deal for my mug cozy, which would be a huge pain in the butt to get onto a mug due to the floats inside the cozy.
If you’re not switching back and forth between colors every few stitches, you’re going to waste yarn with stranded knitting. Intarsia is good for big blocks of color and vertical stripes because the yarn is carried a short distance up to the next row behind the work.
Setting up for intarsia looks like a lot of fun (not). For every color change or block of color in a pattern, you will want to create a mini ball of yarn that hangs behind your work. With stranded color knitting, you would typically knit from the same ball of yarn the entire time for all colors.
Each color block in intarsia knitting will need to be weaved in when you’re done. Unless you’re not using a color for a long while, you probably won’t have much to weave in as a result of stranded knitting.
References and Helpful Tips for Beginning Intarsia Knitting
For a visual guide, a video from KnittingHelp on intarsia. A comment on their site also alluded to the difficult nature of intarsia knitting in the round (which is how I’m knitting my mug cozy).
A video on intarsia knitting in the round from Planet Purl, which shows that to do intarsia in the round, you’ll need to purl every other row (eeewwwww). I suppose that’s better than not being able to put the mug cozy on a mug.
Introduction to intarsia from Twist Collective. The author gives some tips at the bottom of the article, such as adding in detail once the knitting is complete using embroidery or duplicate stitch.
After learning these things, I’m still a bit hesitant to use intarsia for my mug cozy. There are some sections of my pattern that seem like they will be obnoxious to set up and the thought of purling even though I’m knitting in the round is not appealing. But the amount of yarn I would waste in using stranded knitting for this, especially in the sheep section, makes the annoyance of intarsia seem pretty worth it.
I will keep you posted on how this intarsia adventure goes! If you have any tips, let me know!
My test knitting has been slow because I’m using fingering weight yarn and I have been picking it up and putting it down quite a lot. I have also started over twice, of course (it’s very rare that I can get my knit right on the first try).
Even though I’ve only gotten past knitting up a few clouds, I’ve learned a few things so far that may change the way I knit this and what the final pattern becomes.
1. I probably shouldn’t wing the design as I go. Like I had mentioned in my previous post, my gauge using the fingering weight yarn for this mug cozy is much different than the gauge I had used for my initial design (based off of worsted weight yarn used on previously created mug cozies). Instead of counting my stitches and altering my color chart, I started winging it.
It seemed easy at first but now that I’ve finished a few clouds, I don’t like the way they look (not fluffy and round enough). If the clouds didn’t turn out well when winging it, I doubt the sheep or hills will.
Using a fingering weight sock yarn, I’ve gotten about 3 inches knitted. Like I said, gauge is important, even for a mug cozy. Travel mug cozies should probably only be 4 inches tall. So now that I’ve only got clouds, there’s definitely no room for sheep. I need to go back to the drawing board.
Floats are too tight in some places, causing puckering on the knitting around the cloud edges
2. I need more experience and practice in colorwork knitting. As I started making color changes that were 2 inches apart, I noticed I had a lot of yarn being carried around the inside of the mug cozy. It is a huge mess and I’m pretty sure it would be quite difficult to put this cozy onto a mug without having to push, shove and coddle the yarn on the inside into place. It’s not practical and not even worth continuing if I can’t fix this mess.
Too much floating going on in this knitted cozy, it’s a huge mess in there!
I’ve also learned that keeping your floats (the colors not being used at the time that are brought along the back of the knitting) on double pointed needles is difficult when the color break spans two needles. This article from Knitty has some good tips on how to weave in your yarn along the back if you have longer stretches of color. This is something I will definitely need to practice.
Seed stitched cloud, with one row mucked up near the top (woops!)
3. Colorwork doesn’t need to be in all stockinette stitch. I had a few rows of clouds on my needles before I realized that some seed stitch would make for a really fluffy-looking cloud. Knit 1, purl 1, then knit the purls and purl the knits on the next row.
You can see from the picture that I mucked up one row, but since I need to start over again anyway, I guess that’s okay! I love how fluffy and textured the clouds are just by adding the seed stitch.
I was excited to be able to design in more than just a color change. I have made one hat in the past without a pattern but other than that I stick to patterns because I haven’t had much confidence in the past that I knew what I was doing enough to go out on my own.
I hope you enjoyed seeing a bit of this adventure. I’m hoping I can finish a new chart this afternoon and re-start my test knit again tonight or tomorrow. Wish me luck!
Read more about my adventure in creating my first knitting pattern: