Trying new things: Hand spinning yarn

I began thinking about someday owning my own alpacas after John and I went to an alpaca farm / yarn shop while visiting my parents in Wimberley, TX. In this shop, they sold yarn spun from specific alpacas and each skein came with a little card of information about that alpaca. Yes, the yarn was lovely and soft, but it was actually those silly little cards and knowing the alpaca’s name that made me buy the yarn.

Before this, I only bought yarn based on how it felt and looked. After this, I started looking at the fiber content of the yarn I bought and I started reading books about fiber:

The Natural Knitter by Barbara Albright — I own this one and love it. Each fiber discussed is accompanied by a project that works well with it and the book has gorgeous full-color photos from cover to cover.

The Knitter’s Book of Yarn by Clara Parkes — This is one of the first fiber books I checked out from the library and it is JAM PACKED with information and super cute illustrations of animals.

Spinner’s Book of Fleece by Beth Smith — This one is only about sheep, but goes into great detail about many breeds of sheep and each breed is accompanied by knitted swatches of hand spun yarn made from that fleece. It’s a great way to visualize the differences between the different breeds.

*(These are affiliate links.)

I found Spinner’s Book of Fleece interesting because of the sheep and how each fleece could be so different. Spinning was on a list of things that I’d do if the opportunity ever arose but I wasn’t really looking to buy new gadgets for yet another hobby.

…And I already have enough yarn to last a lifetime.

When we helped out at Evan’s Knob Farm a couple of weeks ago, that opportunity to learn how to spin did arise. Kathy, the farm’s overlord (hehe), let me pick out some roving she had created from her flock of sheep and sat me down at her spinning wheel. That first night of spinning was a bit frustrating, but I kept at it for hours until it finally clicked.

My first attempt at spinning yarn on a wheel

And then I went back to it another night and finished this kinda gnarly but in its own way lovely skein of yarn.

After earning my “Hand Spinning Newbie” badge and my “Sort of Helped Shear a Sheep” badge, Kathy sent me home with a big bag of fleece!

When I got home, I ordered a drop spindle and some hand carders from The Woolery (these were a lot more pricey than I was expecting but I couldn’t find many cheaper hand carders on the web that didn’t look like someone had grabbed dog brushes and attempted to market them as hand carders).

Wool on a carder
My first time using hand carders. Look at those fluffy fibers!

The carders worked well, and I think I got the hang of carding pretty quickly. I carded 5 or 6 little batches and rolled them up into rolags.

Then I had to figure out how to use a top whorl drop spindle… Nothing that a little Googling couldn’t fix.

Hand spinning wool
Look, ma! More yarn!

I spent about two hours spinning the bits of wool that I’d carded. A little slow, but I still enjoyed it.

Yarn on a drop spindle
Two hours worth of yarn… phew!

I need to remember to put a cloth or something over my clothes the next time I spin. All of those little sheep fibers cling to my clothes!

If you’ve been into yarny crafts for a while but have never tried spinning, I’d suggest giving it a try. There’s a little learning curve but it’s no worse than the one for knitting or crocheting. Unless you buy fleece, you’ll only need a drop spindle (mine came with a niddy noddy and was less than $20 for both) and some roving to play with.

Let me know if you decide to try it! I’d love to see your first attempts!

Real Income Reports from Real Knit/Crochet Designers

Sorry, it’s been a while since I posted! John and I were WWOOFing for a couple of weeks (this included my first attempt at shearing a sheep and spinning yarn, so take a look).


On to business…

Tara Swiger helps makers figure out what they want to do and how to make it a viable business. I’ve always been impressed by the vast amount of information on her website and blog. She even has a podcast!

I stumbled onto this awesome list she put together: income reports from knit and crochet designers. It’s really interesting to see the range of income that designers make per month.

The most impressive number is a designer who brings in a net of almost $9,000 per month! They attribute that high number to book sales and a subscription-based product. If I’ve learned one thing over the years, it’s that if you want monetary success without killing yourself, you’ll need to take time out of the equation. With the internet, it seems like subscription-based services and high-value, reusable, digital products (classes, workshops) are the way to go.

I also found it interesting that one designer mentioned that free patterns just didn’t work for them, since people looking for free patterns hardly ever converted to paid customers.

I hope you all find this as interesting as I did because I had no idea what I could expect to earn selling patterns on the internet.

5 Real Income Reports from Knitwear Designers

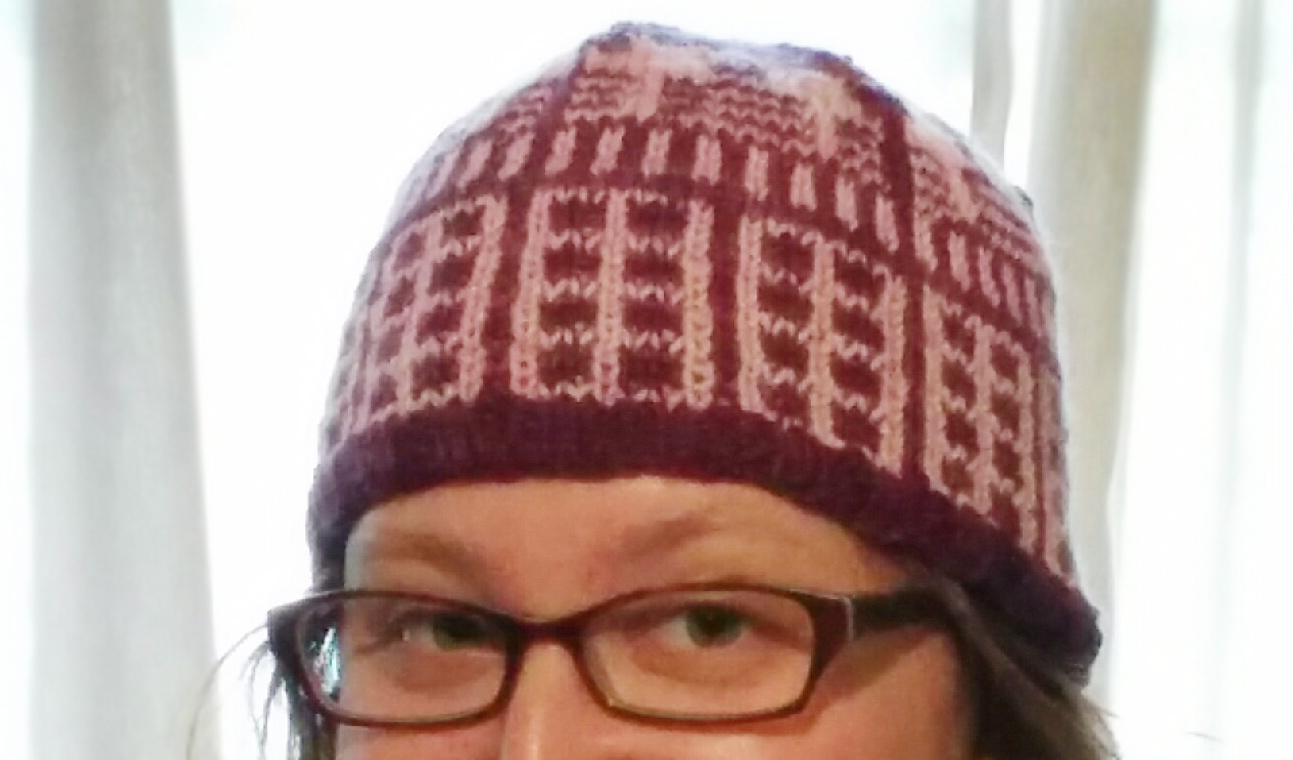
Knitted: Doctor Who – Inspired Hat

INSULATE! Knitted Hat

After the train wreck that was my mug cozy, I felt like I needed to redeem myself as a knitter and I think I did, so I wanted to share this finished knitted object with you all.

I found the INSULATE! hat pattern by Amy van de Laar on Ravelry a few weeks ago when looking for something to knit with two skeins of yarn John bought for me. It’s a 2-color hat, covered in Daleks, and the pattern is free!

Luminous in the May Day colorway, by Sincere Sheep
Polwarth Shimmer in the Plump colorway by Knitted Wit

I wasn’t sure about knitting pink and purple Daleks, so I held off on knitting the hat, hoping to find a more appropriate use for the yarn. But the urgent need for a pick-me-up knit trumped my color concerns and I decided to cast-on earlier this week.

I loved working with these yarns. They are both 85% Polwarth wool and 15% silk. The wool makes the yarn squishy and the silk makes the yarn soft(er). They’re both hand-dyed and had slight variations in color. (And in case you’re wondering, which you’re probably not, fiber-enthusiasts care to know what kind of sheep their wool comes from, which is why it is known that this wool is from Polwarth sheep.)

Whovian in a knitted Dalek hat
Dalek hat and a Doctor Who reference on my shirt (not planned, but I have so many Whovian shirts, it was bound to happen)

Oh, how I love to knit a hat. They’re so quick to knit up and this one only had 3 ends to weave in when I was done — quick finishing FTW.

If you enjoy stranded colorwork, I’d definitely recommend this pattern. Amy (the designer) gives very clear instructions on how to knit the hat and how to knit it without needlessly wasting too much yarn. Rows with minimal color changes actually just use slipped stitches from the previous row so you don’t have to carry the other color around the back. Pretty snazzy!

In other knitting news, I started knitting a shirtie today (that’s a shirt and a hoodie). This is my first non-accessory garment that I will be knitting. I’m nervous but excited at the same time. Will keep you all posted!

Knitting Pattern: Nailed It! (NOT)

I’ve been working on a test knit for my mug cozy for probably a month, picking it up and putting it back down. The intarsia was a slow process, since I designed the color changes based on my own visual likes rather than ease of knitting. I’d also never done intarsia knitting before this.

Sheep in a field - gridded drawing
For your memory, this is the color pattern I was working from.

With intarsia, you create a new little bobbin of yarn to work from each time there is a color change. So, you’re knitting around in blue, get to a cloud, switch to a small bit of white, then switch to a new bit of blue (that’s right, you don’t just pick up the old blue you were using before until you come back around). Because you don’t bring the yarn along behind the work, every time there is a color change, you get a new bit of yarn. For every new bit of yarn, there is going to be an end to weave in.

Intarsia chart
For a visual representation: All of the stars in this section of the pattern show where a new bit of yarn is going to be used. The thicker black lines indicate a section where a bobbin of different yarn is used.

As I was designing this, I had no experience with intarsia, therefore, gave no thought to how many ****ing ends there would be to weave it when I finished the cozy.

Knitting - so many ends to weave in
Attack of the spaghetti monster

I don’t even want to pretend I’m going to finish this test knit.

But either way, NAILED IT!

Crappy knitting
NAILED it! (NOT…)

Hahaha, just kidding. This poor mug cozy is a step away from being knitted vomit.

Aside from being a finishing nightmare, my technique was just not very good. The randomly loose stitches above would be fixed after I weaved in the ends of the yarn — they’re just loose because they’re not quite attached.

The blob thing that should be a sheep in a pasture though… wowwee.

I knit the clouds in seed stitch – k1, p1, then on the next row I’d purl the knits and knit the purls, creating these cute, fluffy clouds because purl stitches create a little horizontal bar that puffs out a bit.

The problem with purl stitches in colorwork is that the previous stitch is visible behind the purl bar. Not so noticeable when it’s white on light blue, but super noticeable when it’s white on dark green. I wanted the sheep to be fluffy, so I tried the same thing on them.

Colorwork gone wrong - knitting
Another example of how using purl stitches in colorwork can go horribly wrong, since I did purl the white stitches below the black stitches

Another issue I had was in using this technique to be able to knit in the round while still using the intarsia technique. I thought I did this correctly everytime I turned my work, but apparently not because the start/end section of the mug cozy looks quite… jacked. If you’re not a knitter, just notice how most sections have a straight line of Vs going down, but in the middle… who knows what’s happening? Also, you should become a knitter.

Bad knitting
Did I add stitches? I’m not sure, but that section looks totally wibbly-wobbly.

And my last gripe with this is that the green on the bottom needs more saturation. It’s being ousted on the next run.

So, it’s back to the drawing board with this pattern. Lessons learned:

  1. Practice the intarsia in the round technique way more, or just knit it flat and sew it into a cylinder when you’re done.
  2. Make sure your yarn colors are all equally saturated or it just looks sad.
  3. Don’t try to be cute with your fluffy purl stitches when doing high-contrast colorwork.
  4. It may not be worth the pain to create a color chart based solely on visual design — take the knitting experience into account and try to reduce the number of ends that will need to be weaved in at the end.

Read more about my adventure in creating my first knitting pattern:

Lost Projects Club: Accountability for Your Insane Crafting

My pals and I had a problem. We are crafty gals and dabble in many things. Fleur has ceramics, jewelry making, crocheting… Carly has sewing, paper craftiness, knitting… I have knitting, crocheting…

We started lamenting about our stashes of unfinished projects. The things you start with every intention of getting done as soon as possible that end up in the corner of a room or packed up in a box. You think about that project every once in a while, wishing you had just finished it when you had the chance but now you have so many more new projects to work on, you couldn’t possibly…!

We blame Pinterest.

I can’t remember if it was Carly’s idea or Fleur’s, but somebody called out with a battle cry,

“Let’s finish this stuff, dammit!”

We decided that we’d get together over tea and the only rule was that you had to work on something that has stagnated, that you haven’t touched in months (or maybe years). We called it The Lost Projects Club.

Every few weeks, we meet up and spend 3-4 hours together doing our crafty thing. The club keeps us accountable to each other to at least continue on with old projects, if not finish them (we’re not very demanding of each other).

It has helped me by forcing me to keep a list of on-going projects and noting how far into them I am. I even finished a scarf last year that I had started in 2009!

If you’re feeling scattered, like you’ve started too many new things and just don’t have time to finish the crafts you felt so inclined to start before, get a group of your friends together and start your own Lost Projects Club!

Woman crocheting
Fleur, doing some tunisian crochet wizardry. Notice the awesome abundance of snacks available in the background to keep morale up!
Woman ironing a skirt
Carly, working diligently on her skirt-making skills
Loom knitting
Fleur, working at this loom knitting!
Paints and a birdhouse
Carly’s daughter took up her own craft too… then got bored


Adventures in Intarsia-land (Or the Difference Between Intarsia and Stranded Knitting)

I’ve done a bit more research on the color knitting techniques I should try out for my mug cozy and I’ve come to the conclusion that I need to learn intarsia knitting.

Before today, intarsia and stranded knitting were all the same to me. Now I know better…

When using the stranded knitting technique, the floating yarn on the inside of my mug cozy was unruly and out of control. To try and fix this, I looked for tips on stranded knitting and found that I could secure the float every few stitches to keep the wrong side of the stranded knitting from looking like a bowl of spaghetti. In that Knitty article that I’d found a few days ago, I failed to notice the “when to use intarsia vs color stranding” section, which suggests that if you have a pattern with blocks of color that span more than 5 stitches, you’ll probably want to use intarsia. Which I do.

Today, as I started yet another Google search for more suggestions on yarn management in colored knitting, I kept seeing “intarsia” pop up. I figured I should at least see what the deal was and when I started learning how to do intarsia knitting (not just looking at end-results), I realized that although intarsia may not make knitting my mug cozy easier, it will probably make a better end product.

Differences Between Intarsia and Stranded Color Knitting

  1. The presence (stranded) and absence (intarsia) of floating yarn behind the work. This is a big deal for my mug cozy, which would be a huge pain in the butt to get onto a mug due to the floats inside the cozy.
  2. If you’re not switching back and forth between colors every few stitches, you’re going to waste yarn with stranded knitting. Intarsia is good for big blocks of color and vertical stripes because the yarn is carried a short distance  up to the next row behind the work.
  3. Setting up for intarsia looks like a lot of fun (not). For every color change or block of color in a pattern, you will want to create a mini ball of yarn that hangs behind your work. With stranded color knitting, you would typically knit from the same ball of yarn the entire time for all colors.
  4. Each color block in intarsia knitting will need to be weaved in when you’re done. Unless you’re not using a color for a long while, you probably won’t have much to weave in as a result of stranded knitting.

References and Helpful Tips for Beginning Intarsia Knitting

  1. The Woolly Brew has a very beginner’s guide in 10 tips for intarsia knitting. I loved this article because it gave me a fairly good overview of how to get started. It also made me dread making all of those little bobbins…
  2. For a visual guide, a video from KnittingHelp on intarsia. A comment on their site also alluded to the difficult nature of intarsia knitting in the round (which is how I’m knitting my mug cozy).
  3. A video on intarsia knitting in the round from Planet Purl, which shows that to do intarsia in the round, you’ll need to purl every other row (eeewwwww). I suppose that’s better than not being able to put the mug cozy on a mug.
  4. Introduction to intarsia from Twist Collective. The author gives some tips at the bottom of the article, such as adding in detail once the knitting is complete using embroidery or duplicate stitch.

After learning these things, I’m still a bit hesitant to use intarsia for my mug cozy. There are some sections of my pattern that seem like they will be obnoxious to set up and the thought of purling even though I’m knitting in the round is not appealing. But the amount of yarn I would waste in using stranded knitting for this, especially in the sheep section, makes the annoyance of intarsia seem pretty worth it.

I will keep you posted on how this intarsia adventure goes! If you have any tips, let me know!

A cute color chart: Tiny 8-Bit Sheep!

76x42 mosaic design
How peaceful… sheep in an 8-bit field

Just a quick update on my knitting pattern design adventure. Worked on this in Photoshop (I guess I gave up on hand-drawing) based on the test knit I was working on. This chart is 76 columns by 42 rows.

The color changes are still very spaced apart, so I will need to learn how to secure the floating yarn behind my work every few stitches. I’d rather figure out the techniques of knitting this rather than force my design into being more knit-friendly.

I’m excited to see how this looks in yarn. We’ll see how it goes…!

Read more about my adventure in creating my first knitting pattern:

Designing a knitting pattern: The learning curve

As I had written a few weeks ago, I have started working on my first knitting chart / pattern. My hope is to be able to design a simple, knitted travel mug cozy featuring a few sheep grazing on a hill.

My test knitting has been slow because I’m using fingering weight yarn and I have been picking it up and putting it down quite a lot. I have also started over twice, of course (it’s very rare that I can get my knit right on the first try).

Even though I’ve only gotten past knitting up a few clouds, I’ve learned a few things so far that may change the way I knit this and what the final pattern becomes.

1. I probably shouldn’t wing the design as I go. Like I had mentioned in my previous post, my gauge using the fingering weight yarn for this mug cozy is much different than the gauge I had used for my initial design (based off of worsted weight yarn used on previously created mug cozies). Instead of counting my stitches and altering my color chart, I started winging it.

It seemed easy at first but now that I’ve finished a few clouds, I don’t like the way they look (not fluffy and round enough). If the clouds didn’t turn out well when winging it, I doubt the sheep or hills will.

Using a fingering weight sock yarn, I’ve gotten about 3 inches knitted. Like I said, gauge is important, even for a mug cozy. Travel mug cozies should probably only be 4 inches tall. So now that I’ve only got clouds, there’s definitely no room for sheep. I need to go back to the drawing board.

An example of puckered knitting caused by tight floating yarn
Floats are too tight in some places, causing puckering on the knitting around the cloud edges

2. I need more experience and practice in colorwork knitting. As I started making color changes that were 2 inches apart, I noticed I had a lot of yarn being carried around the inside of the mug cozy. It is a huge mess and I’m pretty sure it would be quite difficult to put this cozy onto a mug without having to push, shove and coddle the yarn on the inside into place. It’s not practical and not even worth continuing if I can’t fix this mess.

Too much floating going on in this knitted cozy
Too much floating going on in this knitted cozy, it’s a huge mess in there!

I’ve also learned that keeping your floats (the colors not being used at the time that are brought along the back of the knitting) on double pointed needles is difficult when the color break spans two needles. This article from Knitty has some good tips on how to weave in your yarn along the back if you have longer stretches of color. This is something I will definitely need to practice.

Knitted Cloud
Seed stitched cloud, with one row mucked up near the top (woops!)

3. Colorwork doesn’t need to be in all stockinette stitch. I had a few rows of clouds on my needles before I realized that some seed stitch would make for a really fluffy-looking cloud. Knit 1, purl 1, then knit the purls and purl the knits on the next row.

You can see from the picture that I mucked up one row, but since I need to start over again anyway, I guess that’s okay! I love how fluffy and textured the clouds are just by adding the seed stitch.

I was excited to be able to design in more than just a color change. I have made one hat in the past without a pattern but other than that I stick to patterns because I haven’t had much confidence in the past that I knew what I was doing enough to go out on my own.

I hope you enjoyed seeing a bit of this adventure. I’m hoping I can finish a new chart this afternoon and re-start my test knit again tonight or tomorrow. Wish me luck!


Read more about my adventure in creating my first knitting pattern:

Starting a knitting pattern: how a newbie figures out how to design a knitting pattern

This post will be the start of a short series of posts documenting how a complete newbie to knitting pattern design figures out how to do it. Stay tuned for more!

I have been knitting for 6 years, 7 months, 23 days. The first lesson was so traumatic I remember the exact day — just kidding, I blogged about it.

I have knit hats, mug cozies, scarves, cowls, one pair of fingerless gloves, a never-ending shawl and one sock.

Quadratic Cap knit by Mandy Bee
Quadratic Cap (I need to start taking better photos…)

The projects I’ve worked on have been fairly straight forward and close to beginner level. My stitches have become more even with time and I’ve even been able to wing a simple hat and cowl without needing a pattern. Because I’ve become so comfortable with the basics I’ve started working on projects that are a bit more challenging so that I could learn new techniques.

Last January, I decided to try my hand at stranded colorwork. Stranded colorwork involves holding two strands of yarn at once and knitting with each one at a time according to a chart. I thought there would be a tough learning curve with the technique but I found that the most difficult part was keeping proper tension behind the work. I guess with all knitting, tension is mostly going to be the issue to work around.

While working on my first stranded color project – the Quadratic Cap designed by Angela Geosits – I realized the color charts reminded me of the pixel art I used to create in high school. Every pixel in the drawing has its own clearly defined space with no blurred lines. I used to spend hours and hours drawing these, which got me thinking that maybe I could bring something like that into knitting. From that point on, I had it in my head that I wanted to make my own knitting color chart.

Pixel Art by Mandy Bee
An example of some pixel art I drew back in high school

I needed a base pattern for my color chart because there is not much of a point to the chart if it never makes it on to a completed knitting project.

My first idea for a base project was a pair of socks. I love ridiculous socks and I would love to wear a pair of my own design and making.

I started to illustrate the color chart digitally. I created a very simple illustration in Photoshop and struggled with color selection for a while. I don’t know if knitting designers usually have the yarn in mind before they start a pattern or if they pick the colors then find matching yarn, but I figured the very subtle color changes I had chosen probably wouldn’t have a yarn equivalent. As I started searching for a sock yarn palette to use in my pattern, I could see that it was true. Even with 30+ colors in the Knit Picks Stroll yarn selection, this was about as subtle as I could get.

Sheep in a pasture illustration
The start of my color chart for knitting

Once I got to this stage, I stalled a bit. I wasn’t sure if I should just start pixelating the illustration as it was or figure out the gauge then work from there. The answer seems obvious now (gauge then chart) but for some reason I let it stall me.

I ordered the sock yarn during the most recent Knit Picks sale – woohoo, I was on my way!

Planning out different sheep

The next problem is that I finished my first practice sock (a nice lacy sock kit that I got with my first Signature Needles) in August 2014 and I still haven’t gotten the patience to start the next one. I was starting to doubt that I would be getting this pattern does any time soon.

Then I made about 8 mug cozies as Christmas gifts this past year. They’re fairly small and quick (always a relative term in knitting, it seems) to knit up. That is the base project I was looking for. With the mug cozies, I could kind of dip my toe in the waters of pattern design.

Since I have more time on my hands (an extra 10 hours a day), this made it back onto my to-do list. I had bought a gridded notebook to work on charts by hand, so I sketched a few ideas, seeing what looked right at different sizes.

Sketching for a color chart
Rough sketches based off of the digital illustration
Knitting chart illustration
Colored sketch
Final chart, based off of 42 stitches
“Final chart” – 42 stitches wide

I was super happy to have made this progress!

But, and it’s a big but, I hadn’t even started to make a gauge swatch for the cozies using fingering weight yarn. I don’t know why I’d wrongly assumed that knitting the cozy with fingering weight yarn would be about the same as the cozies I’d been making with worsted weight. Or that I would be able to easily go from 42 to 84 stitches so that I could use the chart as-is.

So last night I started the gauge. It’s looking like the cozy will be around 72 stitches, which doesn’t quite fit the chart. I will definitely need to change things around.

Based on how tiny the stitches are, I will be able to add a lot more detail – the sheep bodies can be a little more fluffy-looking, the heads won’t have to be quite so square.

I’m a little worried that the tiny sock yarn won’t be so insulating though. But hey, if it works for your feet, I guess it should work for some coffee.

I’ll continue to post about my first knitting pattern journey. Hopefully it’ll help others on theirs!


Read more about my adventure in creating my first knitting pattern:

Design challenge, day 25, extreme knitting

I found this quote the other day and I was all, “Man, I could totally see that quote overlaying some mountain climber. How inspirational!”

If at some point you don’t ask yourself, ‘What have I gotten myself into?’ then you’re not doing it right.

Then today, I start thinking about what kind of photo could go with it and the thought of a giant yarn stash crossed my mind – one where you’re stuffing yarn into your desk drawers because there’s no more room in the allotted basket/shelves/tupperware set of drawers/closet/guest closet. If you knit or crochet, you know what I’m talking about… It starts with a ball or two of yarn when you start out, then you start visiting yarn shops and you think, “Oh, that’d be great for a [insert knitting/crocheted object here that you’ll probably never even start]”.

So I started searching Flickr for images that I could use and found this amazing woman – my hero – knitting on Splash Mountain with undeniable proof.

Extreme knitting on Splash Mountain

The challenge here was trying to get something usable out of an image that was too small and too grainy.

Photo credit: http://www.flickr.com/photos/starathena/2388909382/